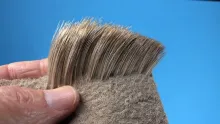
When I talk about hard hair I both mean hair that's hard - like squirrel and polar bear - and hair that's hard to tie in on the hook. We all know the problem: not only is squirrel wings hard as #"¤%&/ to place properly on top of the shank, but they also sometimes seem to fall off for nothing.
|
|
|
|
|
|
|
|
|
|
|
|
|
|


When I talk about hard hair I both mean hair that's hard - like squirrel and polar bear - and hair that's hard to tie in on the hook. We all know the problem: not only is squirrel wings hard as #"%& to place properly on top of the shank, but they also sometimes seem to fall off for nothing. Take an old squirrel hair streamer and pull the wing. It's very likely that it will come off easily. Mine used to do that. And If I didn't pull them, a bit of fishing could do the job. A couple of casts and the wing would come apart.
A little routine
I have come upon a little routine that almost eliminates this problem. It uses a couple of tricks to accomplish two things: keep the bundle of hair neatly together and secure it fairly well on the top of the shank.
The procedure is as follows:
- Cut a bunch of hair.
- Remove underfur
- The bunch should not exceed approx. the double shank diameter when it's hard compressed
- Stack the hair if needed
- Trim the hair to a suitable length
- Either trim to excact length leaving nothing to cut afterwards
- Or cut a bit longer than needed and trim afterwards
The first method makes tying in the wing a bit harder, while the second leaves the very hard and dense stumps to cut when finished. Use the methods according to taste and application.
- Wrap the thread to the spot where the wing is to be tied in
- Spin the thread in a counterclockwise direction giving it a tendency to curl backwards towards your fingers
- Grab the hair over the point where it will be tied in
- Hold it a bit above the shank to the back of the hook
- Pass the thread over the bunch
- Pass the thread under the bunch but over the hook shank back to your own side
- Now pass the thread once more over the hairs. The thread's tendency to curl should keep it pressed against your left hand fingers and keep it from 'falling over the edge' of the hair butts
- You might want to repeat the step above and make one more turn over the hair and over the hook shank as shown
- Now guide the hair and thread down to the shank while slowly tightening the thread.
- Hold the hair firmly on your side while pulling the loop tighter
- The hair should now be one tight bundle on top of the shank, maybe pulled slightly towards you
- Now pass the thread over the hair again and under the hook shank in the normal manner. This should gather the few hairs on your side of the hook shank
- Take the thread under the shank and tighten on the upwards movement on your own side. This locks the hair in place in a tight bundle.
- Spin the thread and flatten it again to remove the twist.
- Make sure that the wing is properly placed and take a couple more tight turns in front of the first. Leave a bit of the hair bases uncovered.
- Trim the butts to a taper if you want a tapered head. Leave them if you want an even base for a hackle.
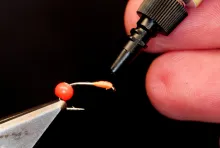
- Varnish the visible basis of the hairs. Thin cellulose based or flexible varnishes like work well.
- Cover the butts in tight, touching turns.
- Trim the stubs after the varnish is dry if needed.
- Log in to post comments