Step by step instructions for a classic salmon fly.

Instructions for the Neo Classic Salmon Fly
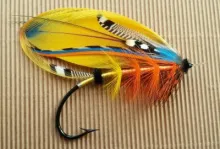
Classic Salmon Fly
| Hook | 4/0 hook, gut eye. |
| Tag | Fine oval tinsel and yellow silk. |
| Tail | Golden pheasant crest and argus pheasant. |
| Butt | Black ostrich herl. |
| First section body | Oval tinsel and orange silk. |
| First section under wing | Argus pheasant and orange turkey. Sided by jungle cock. |
| First section butt | Black ostrich herl. |
| Second section body | Oval tinsel and orange silk. |
| Second section under wing | Argus pheasant and orange turkey. Sided by jungle cock. |
| Second section butt | Black ostrich herl. |
| Third section body | Oval tinsel and orange silk. |
| Third section wing | Argus pheasant and orange turkey. Sided by jungle cock. |
| Main under wing | Dyed red turkey and Argus pheasant. |
| Main wing | Dyed orange and red turkey and topped with Argus pheasant. |
| Sides | Woodduck and Teal and jungle cock. |
| Cheeks | Indian crow sub. |
| Topping | Golden pheasant crest. |
Step 2: The gut-eye. Attach the 8/0 thread at the front, if you don't cut off the end you can use it to make wraps close next to each other. Make a series of wraps backwards and then turn back towards the front to have a good foundation of tread for tying the gut-eye on.
Step 3: Cut a piece of Gut, couple of cm.
Step 4: Shape the gut around a round object. I used my whip finisher as it has the right diameter for the eye size I want. Press with your nails at the point where the ends meet around the object.
Step 5: Tie in the gut-eye, place the legs of the gut-eye along the hook shank and make closely tied wraps, making sure you have the gut placed the way you want it, either on the side or underneath the hook shank. I prefer to have it on the side, others underneath.
Step 6: Shaping the ends of the gut is essential so we can make as smooth a foundation for the head area as possible. So you need to cut both ends in an angle so we can make close wraps over it.
Step 7: If you cut off the ends in the right angle you will be able to make close wraps all the way down over the ends and make a nice and smooth head area.
Step 8: whip finish the thread and cut it off, put a bit of lacquer on it to lock down the materials and make a smooth transition from hook shank to head area.
Step 9: Tag. Start the thread a few turns in front of the barb point, do 3 turns and cut off the end.
Step 10: Tie in the oval tinsel. I use the rule of 7 ties here, which means, I use 2 wraps to tie in the material and then 5 more wraps to tightly secure the material while I am working with it. After the tinsel has been wrapped its possible to unwind those 5 extra thread wraps and tie the tinsel down with 2 tight wraps. This saves a lot of potentially unwanted wraps that might leave a not smooth under body to work on. Don't cut off any of the ends just yet.
Step 11: here you can see the tinsel wrapped and the 5 excess wraps unwound ready to tie in the tinsel.
Step 12: Use 2 wraps to lock the tinsel down and make sure that the two ends lie next to each other on the hook shank. Don't cut off the ends.
Step 13: Make close wraps forward until you reach the point where the thread is above the hook point. Make sure these wraps are close and as smooth as possible. This will make the floss step a lot easier and the result more pleasing.
Step 14: Tie in the floss, again use 2 wraps and 5 more to secure it during the handling of the floss. Wrap the floss backwards down towards the tinsel and back forward again, when you reach the tie off point unwind the 5 extra wraps and tie off the floss with 3 tight wraps.
Step 15: We can now cut off the materials. Again it is better to cut it off at an angle so we get a smooth surface to mount the tail on.
Step 16: Find a tail crest that matches closely to the profile you want.
Step 17: If you want to flatten the curve a bit it is possible to do so with your nails. Gently pressing your nail into the feather will gradually change the curve.
Step 18: Flatten the tie in point to easier mount it on top of the hook shank, use a round nose pliers.
Step 19: Tie in the tail on top of the hook shank, make sure it is aligned well and strait. If this step is causing problems it is usually because the tie in point is not flattened enough. Cut off the excess end from the tail.
Step 20: prepare the 2 strips for the tail make sure they have the same amount of fibres in each strip.
Step 21: place them back by back on top of the hook shank. Make a tread loop and tie down the fibres while you hold them with your left hand to make sure they stay on the top.
Step 22: Cut off the waste material and taper the under body for the butt with a few wraps.
Step 23: Tie in the Ostrich
Step 24: wrap the Ostrich and secure it with 3 wraps. Then continue wraps closely forward. Don't cut the end yet.
Step 25: Use a piece of paper to measure out the segments of the body. Draw the butt points in the body so you get 3 equal sections.
Step 26: When your at the right point you can tie in the tinsel.
Step 27: Next tie in the floss, again using the 7 wraps rule.
Step 28: The floss has been wrapped while holding the tinsel with your left hand making sure its flat and smoothly covered. The 5 excess wraps unwound and floss tied down with 3 tight wraps.
Step 29: Make 5 wraps of tinsel equally spaced.
Step 30: Prepare the strips needed for the 1 section under wing.
Step 31: Merge the strips.
Step 32: Turn your wise and hold the two merged wings back to back on the hook with your left hand and make a thread loop and tie it down.
Step 33: Turn your wise and inspect the result from the front side.
Step 34: Cut off excess materials from the wing. And tie in junglecock feather on each side.
Step 35: finish the section butt and refer to your paper model again for the next section start. Perform step 26 to 34 again for the next section.
Step 37: The throat wing section is a bit larger than the other sections. You need 5 strips for it. And again tie in junglecock on the sides. When done with this step whip finish the 8/0 thread.
Step 38: Change your thread to a 6/0 which will make the mounting of the main wings easier. Its stronger and can save you some wraps. We will change back to a thinner thread after we mounted the main wings.
Step 39: The under wing is merged from two strips.
Step 40: Tie it in again using a thread loop and controlling it with your left hand.
Step 41: Cut the strips needed for the main wing.
Step 42: Merge then together.
Step 43: Tie in the main wing. Use some tight wraps and support the wing while you cut off the excess material. Then use a few extra wraps to tie down the material in the head. Whip finish the 6/0 thread. And switch back to a 8/0.
Step 44: Prepare the 2 sides.
Step 45: Tie in the front side and turn the thread to tie in the back side.
Step 46: Tie in the junglecock and the small cheek.
Step 47: Time to tie in the topping and make the last few wraps to finish off the head shape.
Step 48: Finish the fly, lacquer the head.
- Log in to post comments