
The tube fly - or tube fly system - you can see on this page, is called the Banderillas. The name comes from the Spanish name for the sticks the the bullfigther uses during the fight. The body sections of this fly has some resemblance to these sticks.

The name comes from the sticks used in bull fighting
When I fish for cod, I want to get to the bottom. Often the water will be 4-6 meters (12-18') and there might even be a current. Weight is needed. There are fundamentally two places to add weight: to the fly or to the line.
Sinking lines
I have mostly used the first method - heavy flies - but must admit that I find it both tiresome and frustrasting to cast them. I have used the flies on a medium fast sinking line, which makes them go down faster, but not as fast as I want. Lately I have been experimenting with a superfast sinking line - A Teeny T-500 shooting head on a floating running line. This does not only get to the bottom in a jiffy, but also casts very well. Thanks to the floating shooting line it handles much better than the full sinking WF line I have used until now.
Lighter flies
The heavier line means the the need for heavy flies like my usual crab patterns or other weighted flies lessens.
On the other hand I still want some large flies, because the cod is a very greedy fish, and large flies will attract more - and maybe larger - fish. Tube flies are large and light, but the modular tube flies are even larger - and still very light.
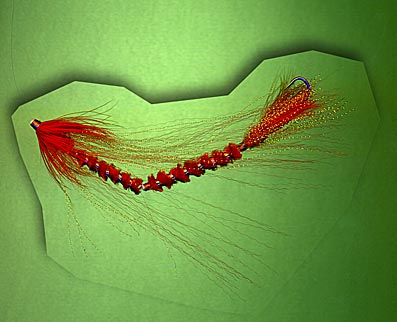
The Banderillas can be a large fly - if you want
Tubular solutions
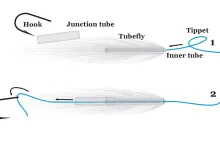
The tube fly is essentially a fly tied on a thin tube, with the tippet going through the tube and attached to the hook. These flies are used largely for salmon fishing and are very popular in the Scandinavian countries.

Two long winged heads
Saving the large size hook makes the tube light and on top of that inexpensive and versatile: you can change hook size and type, and you need not discard the fly if the hook gets dull or bent.
Pearls on a string
By making the tube fly in sections you get even more advantages: the fly can be made even larger, it's flexible and can move in the water and last but not least: its final design and size can be determined at waterside.
The tube fly - or tube fly system - you can see on this page - is called the Banderillas. The name comes from the Spanish name for the sticks the the bullfigther uses during the fight. The body sections of this fly has some resemblance to these sticks.
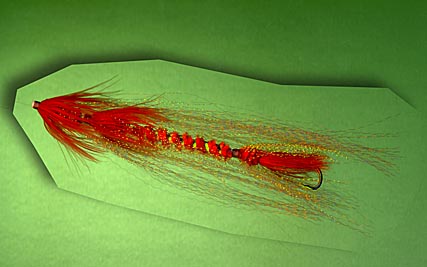
The basic Banderillas:
a wing section, two body sections and a tail section
Other sections
Apart from the body sections, The Banderillas system has two other sections: the head section and the tail section. The head bears a long wing and a hackle while the tail has a protuding piece of tube and a piece of semi soft silicone tube to guide the hook - and a hackle to hide it.
You can combine these sections as you want. On this page you see a single and a double fly - with one and two wing sections.

The cheapest fly material on earth?
Cotton swabs or Q-Tips: a dollar for a hundred...
They can be brittle, so look for the softest kind.
Inexpensive tube tool
Preparation
Tube:
I use tubes made from ordinary cotton swaps for all my tube flies. I prepare them as follows:
Cut off the cotton part with a pair of pliers or a razor blade. Carefully melt a small collar in each end of the tube next to the flame of a candle or lighter.
Make sections in different lengths: whole, half and one third of a cotton swab.
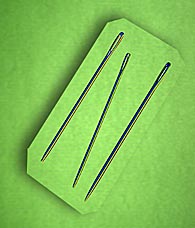
Vise:
I use a large darning needle as a tube tool for the vice. I have bought a selection of needles, as the tubes are different inner diameters. Find a needle that fits tightly inside the tube and set the head of the needle in the vice jaws. Press the tube over the needle till it sets over the base of the head of the needle. It should sit firmly, but sot too firm as the pressure of the tying thread and materials will press the tube and make it impossible to remove the finished fly from the needle.
A commercial tube vice or tube tool will also do fine of course.
Wing section
Materials
| Tube | Plastic tube made from cotton swabs, half length |
| Thread | Red |
| Body | Red chenille |
| Wing | FisHair or similar long synthetic, red hair |
| Hackle | Soft, red hen hackle |
| Head | Tying thread |
Instructions
- Fit a small 1/2 section of tube over the needle
- Start the thread in the middle of the tube
- Tie in a section of chenille pointing backwards
- Cover the chenille and tube to the rear of the tube
- Return the thread to a bit further than the middle of the tube
- Wind the chenille to the same position and tie down
- Cut surplus
- Prepare a section of FisHair or similar material at least 15 centimeters (6") or more
- Tie in the wing and distribute the material all around the tube
- Tie in a large han hackle tip first and wind forward in 4-5 turns
- Tie down and cut surplus
- Form a head from the tying thread
- Varnish
Body section
Materials
| Tube | Platic tube made from cotton swab, full length |
| Thread | Red |
| Rib | Medium flat silver tinsel |
| Body | Red chenille |
Instructions
- Fit a 1/1 section of tube over the needle
- Start the thread in the rear end of the tube
- Tie in a section of silver tinsel
- Wind the thread to the front end of the fly
- Tie in a section of chenille pointing backwards
- Cover the chenille and tube to the rear of the tube
- Return the thread to the front of the tube
- Wind the chenille to the same position and tie down
- Cut surplus
- Wind the tinsel i five open turns to the front of the fly
- Tie down and cut surplus
- Form a small head from the tying thread
- Varnish
Tail section
Materials
| Tube | Platic tube made from cotton swab, half length |
| Thread | Red |
| Hook tubing | Silicone tubing, length as fly tube |
| Hook | Short shank tube hook, single or treble according to taste |
| Body | Red chenille |
| Wings | Red FisHair or similar |
| Hackle | Red hen hackle |
| Head | Tying thread |

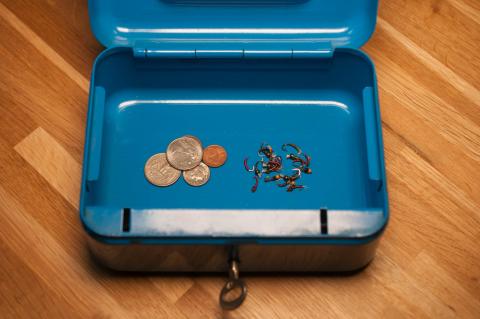
Daichii tube hooks
- well suited for the Banderilleras
Instructions
- Fit a small 1/2 section of tube over the needle
- Start the thread a bit rear of the middle of the tube
- Tie in a small bunch of hair over and under the tube
- Tie in a large han hackle tip first and wind forward in 4-5 turns
- Tie down and cut surplus
- Wind the thread to the front of the tube
- Tie in a section of chenille pointing backwards
- Cover the chenille and tube to the middle of the tube
- Return the thread to the front of the tube
- Wind the chenille to the same position and tie down
- Cut surplus
- Form a small head from the tying thread
- Varnish
- Log in to post comments


John, In order to
John,
In order to keep the materials and tying thread from slipping over the edge of the tube, it's a good idea to melt a small rim or collar in one or both ends of the tube. As it's shown here (for an other application, but the principle is the same).
Martin
Great article. But
Great article. But what do you mean by forming a collar.
The plastic on some
The plastic on some cotton swabs are a bit thin.
Another good source of plastic tubes are the plastic tubes on lollipops. They are much stronger.
That is a great idea
That is a great idea to use Q-tips, just tried one and it worked great.
Thanks for the idea
COOL~BEANS This will
COOL~BEANS This will help me to Tie Tubes quik
Thank you